Tuesday, December 25, 2018

Art Journalling with Ann Butler Designs

Merry Christmas everyone!!

Today's project isn't a Christmas one, I think it's the start to my plan to art journal every week! Today's page was created featuring Ann Butler Designs Products!


I started with a watercolour paper page in my Dina Wakely journal.  I love using Ann's Crafter's Ink as a watercolour medium. The technique I used for this background is called the Kiss technique that I learned from watching Vicki Boutin, the video for the basic technique is HERE my take used inks instead of crayons.

 
My colours, journal and transparency all ready to go.

Smooshed my ink pad on a piece of transparency, then spritzed it with water. I did my colours one at a time, but you can do them all at once.


This is the finished background. I gave it a quick shot with my heat tool to make sure it was dry.

For my border I used Canyon and Desert Sand with Ann Butler Design Stamps by Unity. Love that these stamps have no edge, so you can stamp your image right against the previous image!

As an extra border I used an edge stamp and Desert Sand again.
While the page was drying, I painted my Eileen Hull Trinket Box Die pieces with Sheer Bronze Iridescent by Earth Safe Finishes. It dries so quickly that I was able to move to my next step right away.

I wanted a bit more texture so I stamped one of my images in Desert Sand all over the frame and oval piece.
Under the frame are words from Dina Wakely's Collage Words, and I used TH Distress Collage Medium in Vintage to glue them down.

And lastly I added some TH Small Talk stickers and brushed over them with a touch of  Vintage medium.

Thank you for stopping by and make sure you head on over to Ann Butler Designs to check out some amazing projects and order your products!

Have a wonderful holiday season!

Cathy

Monday, October 8, 2018

Magical Mysteries Blog Hop with Dragon's Eggs and Fairy Wings


It’s Blog Hop time 

and we are featuring the magical mysteries line from Rita Barakat and Emerald Creek!

We are hoping to introduce you to many ways of using these new and mysterious embossing powders, turning your works into magical art. 

A special thank you goes out to all of the talent in this line up. Joe, Midge & Madge, Ken, Fredrique, Cathy, Stephanie and our amazing coordinator Katelyn, we couldn’t have done this without you. 

It’s Blog Hop time 

and we are featuring the magical mysteries line from Rita Barakat and Emerald Creek!

We are hoping to introduce you to many ways of using these new and mysterious embossing powders, turning your works into magical art. 

 To enter the contest just comment on every project in the Hop by clicking through the links at the bottom of the page. The contest closes October 10 at11:59pm  One lucky winner will be announced Friday October 12.


Wow!! If you have not tried/seen or gotten your hands on these amazing powders, you NEED to!! A magical partnership between Rita Barakat and Emerald Creek has brought all this shimmer and beauty to you!
So thrilled to share these with you, and so honored to be a part of the Hop with such incredible creatives! 

Be sure to follow the hop, I'll pop the list down at the end of this post for you. You will be inspired to create with after seeing the projects from the Hop!
And on to my project! It's all about the fairy magic.


These powders were a dream to work with. So much lustre and shimmer and a touch of glitter.
I started with a 5X7 canvas board and used Dina Wakely Black Gesso to cover it. Once that was dry I stamped a border with my Branch Out and Mushroom stamp from Emerald Creek. 


I moved that aside and then cut out a small piece from my Graphic 45 paper stash of Fairie Dust. I embossed the first letters with Kiss of the Fairy and did the border with Dragon's Egg.
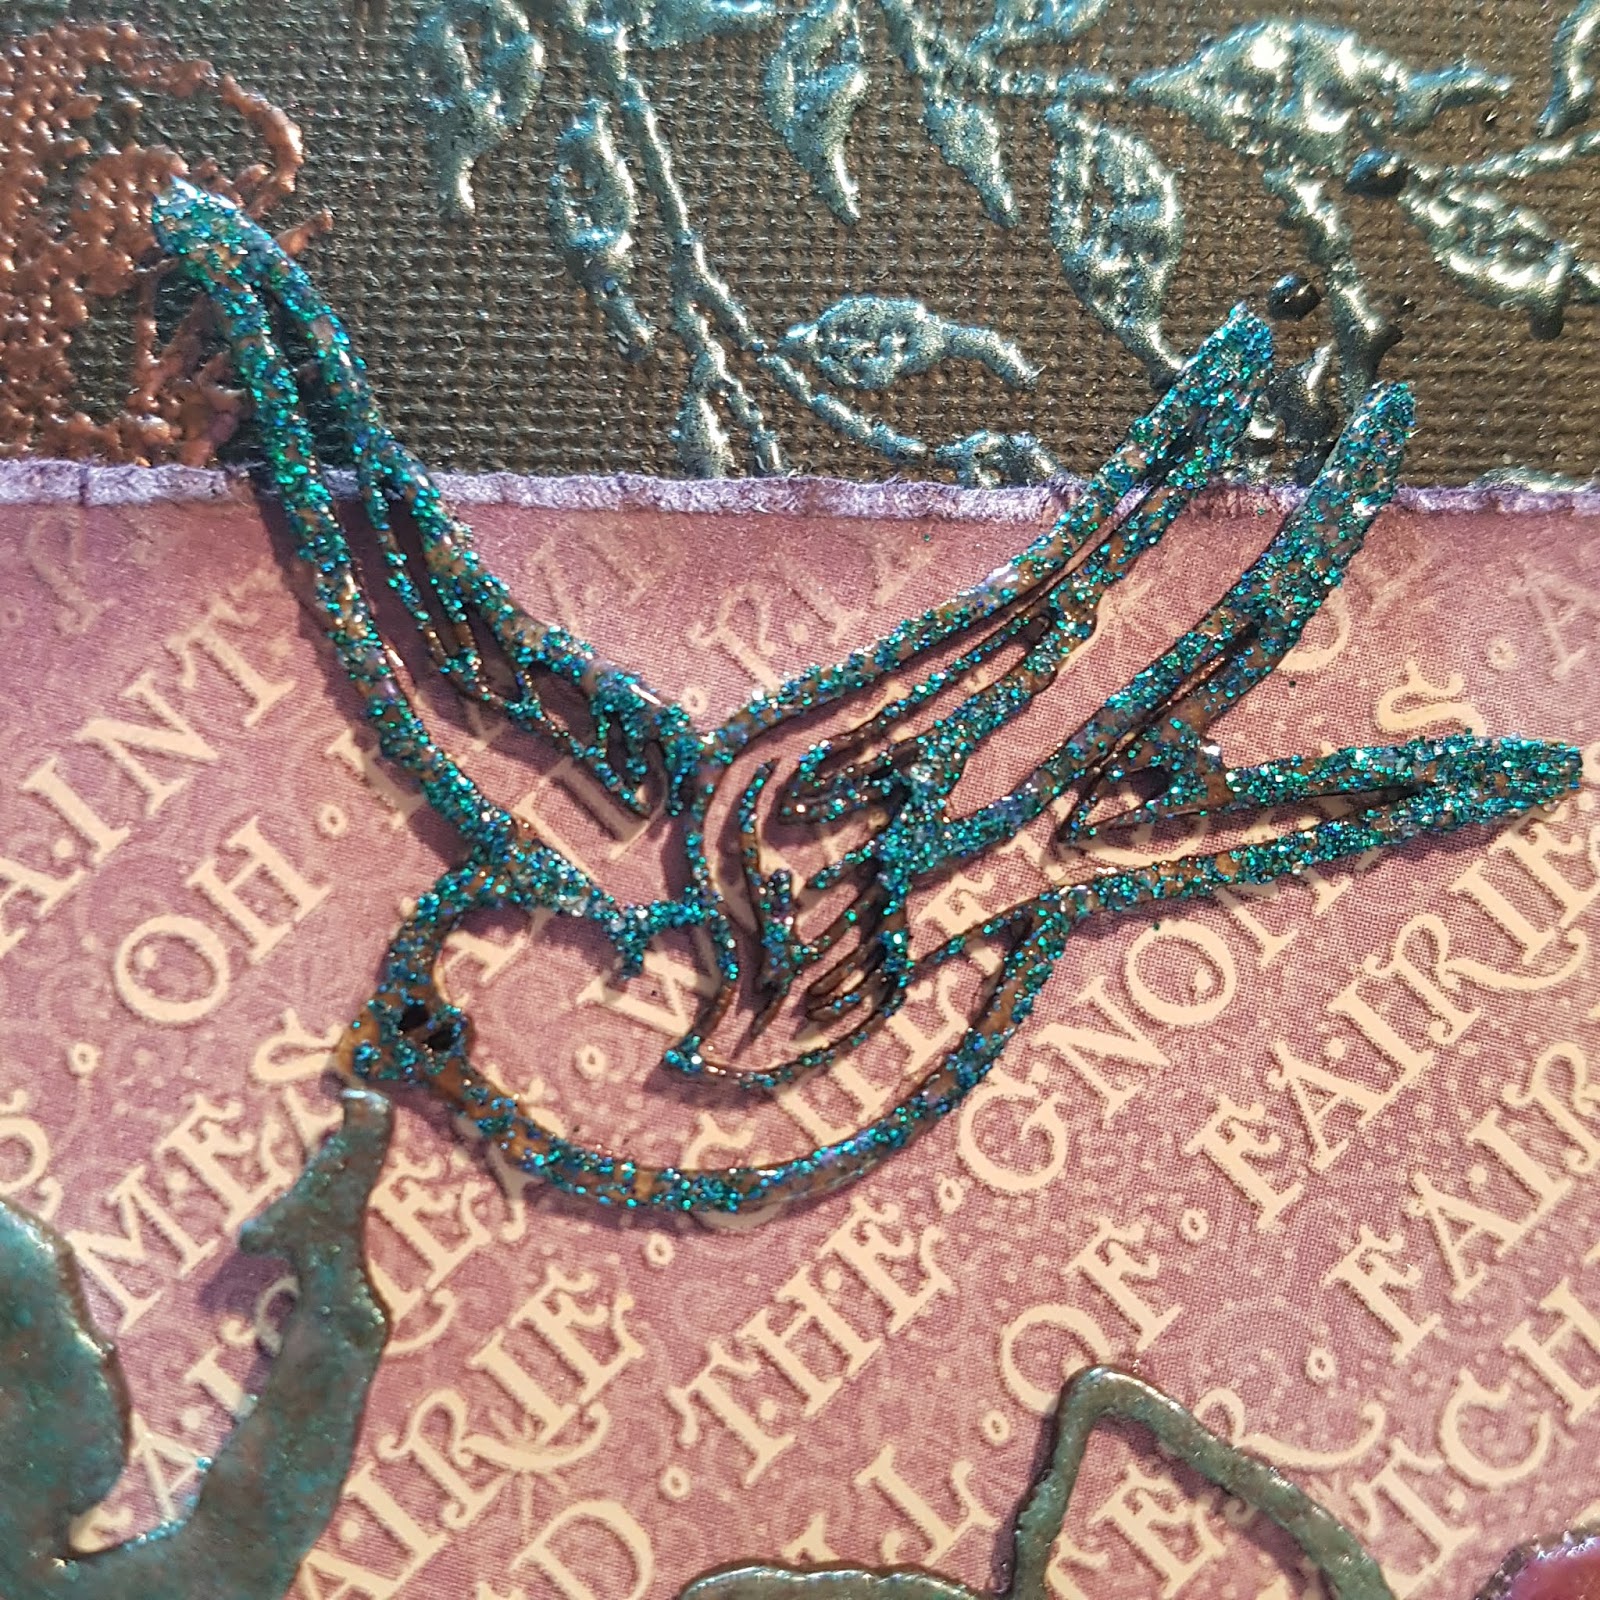
Then it was time for the fairies!! Adorable little chipboard ones from Southern Ridge Trading Company. Let the embossing begin! For these little ones I used the Fairy Wings set and started with the base for all of them. The little bird was done with Mermaid Fin (such pretty glitter)


I have the bird feeding fairy and the artist fairy painting her canvas.
This little one was done with the Fairy Wings Base, Green, Gold and Blue over the base.

The artist fairy was done with the Fairy Wings Base, Blue, Purple, Pink and on the body I added a touch of Kiss of the Fairy for the sparkle.
 

 And one last shot of the completed project. I just love the colours and how they all work together and you can use the Fairy Wings base on it's own too, such a pretty iridescent purple shine.


Now make sure to follow the hop to be inspired and for your chance to win!


Happy hopping and enjoy the inspiration featuring Rita Barakat's Magical Mysteries Embossing Powder created with Emerald Creek!
Happy Thanksgiving (for us Canadian folks) and have a wonderful week!
Cathy

Supplies Used:

Rita Barakat Magical Mysteries Embossing Powders - Fairy Wings Kit, Kiss of the Fairy, Dragon's Egg, Mermaid Fin, Midnight Magic
Emerald Creek Mushroom Stamp
Emerald Creek Branch Out Stamp
Dina Wakely Black Gesso
Graphic 45 Fairie Dust paper

Monday, September 3, 2018

Thoughts and Theories

I do love my travelers journals! Today over on the Southern Ridge Trading Company blog I have a journal I created that will be heading to a friend's house soon.

I love how the chipboard from SRTC can take any kind of medium I throw at it!! For my pieces on this journal I used Emerald Creek embossing powder, Finnabair wax, Ranger Foil and Dylusions paint. 


For all the details and close ups hop on over to Southern Ridge Trading Company today and have a look. There is also a full supply list to check out too. To have a look at the inserts that are inside the journal you can check them out HERE
These were created with dies and stamps from Quietfire Design.

Thanks for stopping by and have a great first week of September!

Cathy

But First...Coffee

I had the honour of being a guest designer in August for Quietfire Design
Thanks so much to Suzanne Cannon for  the opportunity to create with her amazing designs.

For this project I used the fabulous set But First, Coffee
You can never have too many coffee related stamps in my world!

Here's a little peek for you!


For all the details and full card, head on over to the  Quietfire Design blog and have a look :) 

And while you're there be sure to check out some of the amazing dies, created from Suzanne's calligraphy. 

Thanks for stopping by and have a great week!

Cathy

Tuesday, August 21, 2018

Clipper Street and Seth Apter

Yes, that title is correct! Seth Apter spent three days teaching right here in Langley, BC, Canada at Clipper Street Scrapbook Company! And I got to be there for the Saturday and Sunday class.

Anyone else ever have an experience that you just can't fit in a Facebook post or Instagram blurb? Well that was my weekend. I don't even know if I have the words now to describe it, but I'm going to fumble all over myself and give it a try.
I think everyone knows how much I love my LSS, Clipper Street. I am grateful on a daily basis that I have this place to go to, for creative supplies, for inspiration, for a talk and a vent too. Deanna works so hard for us to bring in amazing teachers, all the newest product and the whole team is just amazing. Thank you Deanna and all the amazing team at Clipper Street! I did a post a couple of years ago about this fabulous place and you find that post HERE 
I also wanted to give a shout out to the anonymous person that called or emailed Deanna at Clipper Street and generously paid for half of one of my classes. I do not know who it was, but that was an amazing kindess and I was a bit overhwhelmed by that gesture, Kim and Deanna can vouch for that. So to that person, thank you for your kindness!

I had the honor of meeting Seth a couple of years ago at Creativation when I was there with Emerald Creek. Sometimes I fan girl a bit (okay A LOT, there were witnesses to most of it LOL) and talking with Seth was no exception. But he talked to me like a peer and was so kind and gracious, I was just in awe of that experience. Then this weekend having him teach for two full days and being a part of that, mind boggling. Seth is so incredibly talented and so generous with sharing his knowledge. He was so encouraging in class and walked the room to help everyone! As I listened to him teach and learned new techniques, I also learned much more about creating and "letting your piece tell you what it wants/needs". I found learning from Seth to be such a stress free environment, even though I went in thinking "omg, what am I doing here, I shouldn't be here, I'm not good enough, what if i make a mistake, what if I put something in the wrong place" Trust me, you can have all those thoughts, but after a few minutes of being in class and listening to Seth and seeing him do a demo, those thoughts will disappear! You will feel like you belong there and if you have a question, ask it!! Seth is very open with his ideas and help and sharing his talent. I will always be so grateful for this opportunity and a huge thank you to Seth for how approachable he is, how gracious and kind he is and for sharing so much of his talent with the rest of us. It was an honour to have been in your class Seth.

And how cool is that denim shirt!? It even has paint on the back of it!
Now on to one of the best experiences I have been lucky enough to have.
I think most of you who visit my blog know who Seth Apter is, you can find his incredible art/post/supplies at The Altered Page. And you will want to and follow him and see his artwork, go aheadgo add the link to your favorites, I'll wait! :)
The Saturday class was called Get Baked, featuring Seth's new Baked Texture Embossing Powders that he created with Emerald Creek Craft Supplies. Our first project was a small canvas using the Vintage Beeswax and learning some collaging and mark making.


Finished project! 3 glorious layers of Vintage Beeswax!
 
I love this one! Reheated this section and pressed this stamp into it for texture! Look at the edge of the a and r to see the nice deep impression I got!
 The afternoon was a larger canvas using all the Baked Texture powders. Learned so much about layering paints and creating focal points. And in case you're wondering, the answer is yes, Yes you do need all of the Baked Texture powders.


Not complete, I still have some marks to make. But I love the Chunky Rust I added.

If you're still hanging in here, thank you!! I know this is a long post! Sunday's class was called 52 Card Pick Up and it was an absolute incredible learning experience! I think one of the favorite classes I have ever been a part of. A deck of black gessoed cards and a day of getting painting, stamping, stencilling, collaging and NOT overthinking! Very freeing to just do/create and to do it in an environment where you have such an encouraging teacher that says "if I go left and you go right, that's okay"

Yes, I used a colour called Pumpkin Soup!! I wanted a different colour but it was being used so I just winged it AND I quite like it! Just do it!


Not all 52 cards are completed, but they are ready for collaging! It was such an incredible experience and one I won't forget. Learning to just do and not overthink is a hard one for alot of us, but if you have the opportunity to take a class with Seth, do not miss it! You will learn so much more than just techniques.

Thank you for reading this far and have a really wonderful week!

And as always, thank you for all the support!

Cathy

Tuesday, August 14, 2018

The "Be" Notebooks

Happy Tuesday! I'm very excited to share with you my guest post over at Quietfire Design. Thanks so much for having me Suzanne!

Such beautiful calligraphy/hand lettering from Suzanne Cannon that have been turned into stamps and dies!!

Here is my first guest post, The "Be" Notebooks for a travelers journal.


For step out instructions and more close ups of those beautiful quotes make sure you check out the full post on the Quietfire Design Blog today! And while you're there make sure you check out the store and all the wonderful dies and stamps.

Thanks for checking in and I hope you all have a great week!

Cathy

Wednesday, August 8, 2018

Exciting News!!

I am very honored and excited to be a member of the Creative Team for Ann Butler Designs!! Looking forward to sharing projects created with some really fantastic products! Stencils, stamps, ink and iridescent paint!! And be sure to check out the rest of the creative team as well, there are some incredibly talented ladies ready to show you their creations too!
So here is my first ever "unboxing" video!! I'm trying to be brave and try new things. My apologies that it's sideways, told you it was my first one, but you can still see all the fabulous products that the creative team will be working with!


Thanks for stopping by and having a look. Stay tuned to see what's coming soon as the creative team gets busy!
You can find follow along at 
Ann Butler Designs website and you can also find her on Facebook HERE 

Here is a pic of the whole team...see, I told you there was some talented ladies here!


Lisa Rojas - Creative Team Coordinator and co-publisher of  
Tammy Santana 


Have a great day everyone!!

Cathy

Monday, August 6, 2018

Vintage Sewing Storage

Ohh happy long weekend Monday for those of you in most parts of Canada!! I spent my morning helping to pick 5 ice cream buckets (4 litres each) of blackberries!! It was a stabby, scratchy process! But the blackberry jam my Dad makes, is worth it!! :)

Now onto my Vintage Sewing Canister! With some amazing pieces from Southern Ridge Trading Company, a fabulous die from Eileen Hull, Baked Texture Embossing powders from Seth Apter and Emerald Creek and Distress Inks and Paints from Tim Holtz....I have this wonderful little gem!


For more details, some great close up pics of those gorgeous scissors and a list of all the products/colours used, head on over to the SRTC blog today!  And while your visiting be sure to have a look at some of the incredible projects being created by the rest of my teammates!

Thanks for your support, it is always appreciated!

Cathy


Monday, July 9, 2018

Create From Your Soul

It's been a bit since I've shared here! But I'm back with this great wall piece featuring Southern Ridge Trading Company chipboard.

Saw the words and had to have them! Saw the Pearl Strings and had to have them! And everytime I see them I love them more....I know, I'm so weird!! LOL

All shimmery! I love the shimmer and it stays where it's put, unlike glitter LOL 


For the details and close ups head on over to the  Southern Ridge Blog and check it out. Don't forget to have a look at my amazing team mates projects created  using SRTC chipboard too! You will be inspired!

Thanks for being here and have a great week!

Cathy

Thursday, June 21, 2018

Christmas Ornaments in June

I think it has been established that I love the beach/ocean/tropical and would create with that theme all the time! I'm very fortunate that lots of my fave companies have that theme! :)

A few weeks ago I shared my first ornament created with fabulous Southern Ridge Trading Company chipboard, you can go back to check out that one HERE
I had a few more pieces left over and decided I needed another ornament. And here is the second one that I created.


The wooden tag is from SRTC and the wood like finish is actually a piece of napkin that I got from PEI last June. I used DW Gel Medium to put it on and it pulled apart in just the right places!

The full wooden tag.

This is where the napkin tore a bit and you can see the wood underneath.

The lobster is embossed in Candy Red and then again with the Fractured Ice over it. The crab is just done in the Candy Red.

Look at that gorgeous little crustacean!

The center word blocks are from Kaisercraft Beach Shack Collection and the baby seashells just had to be added.

I do have one more tag to work on and I plan on creating another beach themed ornament for my Christmas tree :)

Supplies Used:

Thanks for stopping by and have a great rest of the week everyone!

Cathy