Saturday, December 31, 2016

Happy New Year!

A new year has begun and I begin a new journey with the Mixed Media Mojo Design Team! An awesome way to start 2017! 
Mixed Media Mojo January Challenge
Theme - New
Twist -Clocks
http://mixedmediamojo.blogspot.ca/2017/01/happy-new-year.html


I found the new part to be very easy, I used new craft supplies! I think we can all do that! And for my twist of Clocks, pocket watch image and cogs of a clock. I love timepieces and I could sneak them onto just about any project I think! :)


I started with a 6X8 canvas board, gesso'd it, then painted it black. I then added the Dylusions Tempting turquoise and the Deco Art Crackle medium. I used a air dry paper clay and molds for my flowers and the Emerald Creek pocket watch stamp and Archival ink to make the image, also on the paperclay.


I painted in the flowers and leaves with Dylusions paint in Tempting Turquoise and Dirty Martini and also just a hint of silver for a bit of shimmer.

The flowers made from the paper clay were painted with alcohol ink in turquoise and a dark dark red, just to grunge them up a bit.

Found some old watch faces and clock hands and inked them with the same colours of alcohol ink so then blonded in a bit better and again, because i wanted them to look a bit old and worn. I love the alcohol inks for being able to add some colour and aging to metal. also a new to me thing as I really had never used my alcohol inks much before.

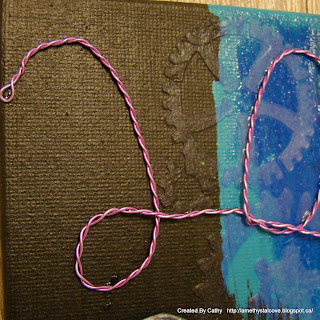
My 2017 was done in purple wire using my NEW Twist & Style Tool from Eileen Hull. First time ever using it, so it is going to be a learning curve. I can't wait to have practiced enough that I can do names and words, going to make for some great personalized gifts and projects!!


Here is quick snap of all the products I used for this project, except for my Twist and Style, which I completely forgot about in the other room.


Thank you all for stopping by and I can't wait to see what mixed media mojo you share with us this month! Please make sure you head over to the Mixed Media Mojo challenge and see all the wonderful projects the Design Team have created to show you!


Happy New Year and be safe out there tonight!

Cathy


Tag #12 - Tim Holtz 12 Tags of 2016

Thank goodness there are 31 days in December!! I made it!! all 12 tags of 2016 and one was even a winner!! That was definitely one of the highlights of my creative year! I still went with a Christmas one because I already knew what charms I wanted to use :) Amazing work everyone that participated in the Tim Holtz 12 Tags of 2016, it has been so inspiring to see all the different takes on each tag and to see how inventive everyone is when they don't have the exact supplies!


I was quite excited that I had the burlap to use. I really love it! I did not have the shadow press supplies so I just used one of my dies and embossed a piece underneath with Oil Rubbed Bronze from Emerald Creek.

Look at the texture in that embossing powder!! Emerald Creek has some of the most incredible custom mixed embossing powders!


Enjoyed the journey with Tim and all of you for this year. I think I may just have to do it again if Tim does 2017, plus I have developed a small addiction to tags!! LOL

Hope you all have a safe and happy New Years Eve!! Cheers to 2017 being full of inspiration, new friends and don't forget to support your creative friends near and far.

Thank you for stopping by!
Cathy


Thursday, December 29, 2016

Emerald Creek - A Year In Review

Wow!! What an incredible and creative year with Emerald Creek! It has been such an inspirational year with seeing all the Design Team creations and seeing all of the beautiful creations that all of your have shared with the challenges every month. I love seeing how people use the same product in so many different ways. And lets be honest here...when you have products as excellent as Kim, owner/head creative of Emerald Creek, has it's very easy to create beautiful projects!
If you want to see all the separate links for my Year In Review you can find them all at the Emerald Creek Dares blog.
Here on my blog here is a collage of my projects for the year! 


Thank you for all of the support and comments and inspiration in 2016!! Here's to more sharing, support and creating in 2017!

Have a great day everyone!
Cathy

Friday, December 23, 2016

I Was Ahead of the game!

I was so prepared and had everything timed out and what days I was going to work on what gifts etc....then I got an abscess tooth and my face was swollen to the size of a baseball and soo painful. I lost two days of crafting time. Went to the clinic, major antibiotics, on the mend, face is only size of a ping pong ball now and pain is greatly reduced and now I have to play catch up!! 
I did get some ornaments done before the tooth issue. My sister asked me to make some ornaments for her, as gifts for our Aunts and Uncles. I tried some new ideas and liked how they all turned out!

The tree box and cork ornament went to one set and the purple Believe and snowman hat went to the other set.
Used a TH bottle brush tree for the first time!! Stained with Evergreen Bough, then dipped the edges in Picket Fence paint and Soft Fallen Snow ep from Emerald Creek.

Stained the baubles with turquoise and silver alcohol ink and hot glue them into the tree.

Found a gold star in my stash but wanted it to be more sparkly so I dipped it in glue and then dipped it in Irridescent sparkle ep and added some distress glitter too.
 
Sliced a wine cork into circles (on the hunt to find a better way of doing this so I can get them more uniform), glued them together then added the steampunk tree charm and the reindeer charm to a piece of jute and tied them in the center.


A little irridescent medium added to my distress paint to paint the ornament, then punched (another TH punch that I completely forgot i had) out the snowflakes on shimmery silver cardstock.

Dylusions stencil, texture paste with the irridescent medium to decorate the back.

And last but not least, a little snowman hat. Yes i found this idea on pinterest and it worked out!! I used one of the K-cups from my coffee machine, painted it with Dina Wakely's black Gesso and glued that to a circle of black cardstock (also gesso'd this so the blacks matched).

Glued some ribbon from my stash around it and used it for the hanging part as well. The greens and berries were again things I had in my stash of craft supplies.

So my family has new ornaments for their trees, my sister got gifts to give them and I have some new ideas for ornaments for my craft fair next year! And I've already added to my ribbon stash for the snowman hats! LOL ANd I know we will definitely have a pile of K-cups because we drink alot of coffee in this house!!

Thank you all for the support and comments this year, it has been appreciated so much. And this year has brought me in contact with so many new crafting friends all over the world and I am so grateful for that! Hope that which ever holiday you are celebrating, it is filled with love and laughter and all things wonderful for you and yours! Merry Christmas from my home to yours!!

Thank you!
Cathy


Saturday, December 17, 2016

Winter Wishes for All

Only 8 more sleeps till Christmas Day!!! Woot Woot!!! But first it's the Winter Wishes Part 2 from Emerald Creek!! I did a home decor piece for the holidays this time. Using an old frame I've had kicking around and one of my favorite Emerald Creek stamps I now have a new piece for my wall or my little mantle.
Make sure to share your Winter Wishes over at Emerald Creek Dares Challenge for your chance to win a $50 GC to order all these amazing products!


I started with an ivory piece of cardstock and sprayed it with Distress Spray in Tea Dye and Vintage Photo. I stamped my holly branch stamp on the stained paper and then coloured it in with Distress markers, the Christmas Polka was also stamped on the this paper. I gessoed a wooden frame then painted it with Candied Apple, and sponged over that with Vintage Photo and lastly with Ground Espresso.

Once I had the holly branch painted, I took some Picket Fence paint mixed with some Soft Fallen Snow embossing powder and Wendy Vecchi's Pearl Spray, painted the white berries and then splattered my images to add a touch of "winter snow".


I painted in the swirly pieces with Candied Apple Distress Paint and a spritz of Pearl Mica Spray from Wendy Vecchi's line.

The Christmas Polka stamp on the stained cardstock, torn around the edges and curled over some thick twine to keep it in place.

Please make sure you swing by my team mates blogs and see their incredible projects!


Enter your Winter Wishes at Emerald Creek for a chance to win a $50 GC!! You know you want to!! :)

http://blog.emeraldcreek.org/

Thank you for stopping by and don't forget to check out the EC Design Team projects from  the links above!
Have a great weekend!

Cathy

Thursday, December 8, 2016

December Already!

The last few months have gone way too fast!! I am in Christmas mode, had a craft fair that was mildly successful and have rearranged my living room so I could Christmasfy my house! Almost done that part too.
Today I'm sharing a birthday card (you thought I was going to say Christmas didn't you?) that my son asked me to make for a friend of his. I wanted to keep it simple and the info he gave me to work with was that her favorite colour is red. I used some thinlits and voila a card that I was happy with. And the recipient liked it too.
Used my butterfly thinlits and the mixed media #2 set. I used the swirly one (I love the swirls) on a black base piece, then ran it through again on a red sheet. Layered the black piece over a solid red piece, then used the little bits to fill in some of the unused space. I even used black on black and I loved how it added just a hint of texture.

Black swirly on the black base

And using some of the red parts to fill in the negative space too.

On the underpiece of the butterfly I used some of the gold foil I had in my stash but never tried to use. Just in little spots for some colour and I can now add foil to my list of supplies that I like to use!! :)
I really like this card and love all the colour possibilities that I could use with this. It was not too difficult to put together, just a bit finicky with glue and the tiny cut out bits I added.
 It's late for me, 2am, so I should attempt some sleep tonight so I can finish some Christmas projects tomorrow.
Thanks so much for stopping by and have a great day! 

Cathy


Wednesday, November 30, 2016

Tag #11 - Tim Holtz 12 Tags of 2016

Holy Heck!! I don't think I have cut it this close in the previous 10 months!! BUT....I made it...barely!! 
And I know you're all thinking, here comes another Christmas project, but NO, I had no rub ons of any kind that were wintery, Christmasy, or autumny!! I only had some that were...BEACHY!! So this is how it went!


I had coloured rub ons that were beachy and had gotten the tropical dies awhile ago, so it had to be a beachy tropical tag this month!
Yay!! I did have some cork and the cardboard to use, and for my attachments I used the Emerald Creek Angel Fish and dyed them in Turquoise alcohol ink.
I used some extra twine I had in my stash and a piece of drift wood I picked up on one of my trips to the beach with my nephews!


And voila....my November tag is completed! And now I want it to be summer so I can go to the beach, enjoy the sun and find more driftwood and seashells!! :)
I sure hope I have the supplies for the December tag LOL Or we may be heading to the beach one more time!

Thanks for stopping by and hope you are having a wonderful week!

Cathy
 

Tuesday, November 29, 2016

A Keepsake For Friends

Wow!! I can't believe I haven't posted in over a week!! I was so busy getting ready for a craft fair and one of my best friends came over for the weekend and just everyday trials and tribulations took over. But I am back today!! 
I wanted to share a canvas I made. It has the spot for someone to add their own picture too it!

This is a 10X10 canvas. I did the background using Tim's Collage medium to adhere a piece of lavender tissue paper, after I had crinkled it up and then spread it out again. I like all the bumps and ridges this gave me. I then took a dry brush and used Picket Fence Distress Paint to just swipe across some of the raised parts so they stood out a bit more.

 
For my flowers I used my Tattered Florals die and the centers of the flowers are done with the Tiny Tattereds! I inked the edges of the flowers with Distress Ink in Dusty Concord and attached them with Glossy Accents.


The stems of the flowers are some sheer lime ribbon I had in my stash then tied them in a bundle with a purple bow. also ribbon from my stash.

The word "Friends" is a chipboard piece from Southern Ridge Trading Company that I embossed with Emerald Creek Dusk Stone Violet Embossing Powder

I love how this one turned out and I'll be sharing a couple more that I have completed over the next couple of weeks!

Thanks for stopping by and hope your week is off to a wonderful start!

Cathy

Friday, November 18, 2016

Wild Whisper Inaugural Blog Hop

Welcome to the inaugural blog hop, introducing Wild Whisper Designs!! A brand new Canadian company designing their own paper lines and carrying matching embellishments from other companies. I am so honored to be a part of this exciting day and to have been able to create a couple of projects to share the Wild Whisper Holiday Style collection with you all.

I created a Christmas postcard and a pocket scrapbook page. I used some of the 12X12 sheets, the 4X6 cards and the 3X4 cards too.  The hardest part for me was having to decide which side to use because I love them all!! And I did not want to cut into my pages, but sometimes I just have to do it! 

Up first is my 4X6 Christmas post card. I went with this size so I could use the full antler background and I could pop up my layers a bit more on the front and still be able to mail it! 


The background is the 4X6 antler card, then I have used a piece of the teal plaid from the 12X12 pages for layering, and I used a left over piece from one of the 3X4 cards to stamp Merry Christmas on. The stag and the Merry Christmas stamps are from Emerald Creek.

Directly behind the stag is a piece of a 3X5 card in a lighter teal, then the plaid.

I love how the whole collection matches so well!
 
The Merry Christmas was stamped on a piece of a 3X5 card and then layered on the teal plaid.

My second project was a pocket scrapbooking page. I have had these pages in my stash for a while and just hadn't gotten around to using them. As soon as I saw the Holiday Style collection, I knew I had found my muse!!


This is the page with my little flip pockets closed and showing the the cards I used.
 
This is the 4X6 card and I knew what picture I was going to use, even though it makes me look ridiculous! LOL

And "Dressed in Holiday Style" is me in my "Free the Elves" shirt with my elf hat and elf shoes. My kids just rolled their eyes when they walked in the door and here I was!! LOL


The bottom half of the page with a 4X4 flip pocket, and inside this pocket is a trimmed 3X4 card and the "notes" piece is one of the 3X5 cards too.


And under the second flip pocket is my daughter and I! She is a bit like me :) But we love our holiday style!
And for the strip down the side I used the teal plaid. And you can see here the back of the Dressed in Holiday Style is this gorgeous firework. You can leave it as it is, which I did or you could put another picture in the pocket.


I loved creating with this collection and I know I'll need another one just so I can use the other sides of the cards! And I still have pieces left that I can finish a few more pocket pages, I can do a 12X12 layout and I'm pretty sure I'm going to be fussy cutting out some of the sayings on the 12X12 page. So much fun with this collection and I can't wait to order the Adventure Collection, I 'm not outdoorsy, but I will be able to have some good pics to use with the Adventure Collection!
Thank you so much for stopping by this stop of the blog hop and welcoming Wild Whisper Designs to the paper crafting industry!! Don't forget to hop over to the other blogs featuring Wild Whisper Designs!
You have a chance to win both collections, Holiday Style and Adventure!! Just make sure you visit and comment on all the posts in this blog hop and both of these new incredible collections could be yours!
You're next stop for inspiration in the Wild Whisper Blog Hop is 
Katelyn - A Creative Journey 
Have a great hop everyone!

Here is your complete blog list!! You have until November 25th to comment on each post for your chance to win!!!


Cathy