Showing posts with label Tim Holtz. Show all posts

Thursday, February 21, 2019

Creative Reminders

Today I'm sharing my! It started with a challenge from Rita Barakat on New Year's Eve and then I kind of wanted more.
I'm sure I'm not the only that struggles with being/staying positive somedays. I have great days, but some days are hard. So what started as a challenge, turned into little embossed/foiled/stenciled/papered labeled wooden tags that now hang in my kitchen, where I can see them everyday!
There are no step outs on these little lovelies, just the finished projects and some close ups of the gorgeous texture. And I used some of my favorite companies to create these.


The little hanging tag family

It all started with this embossing challenge in the Rise and Shine with Rita Barakat facebook group. 

Chipboard pieces for the background are from Southern Ridge Trading Company and all the embossing powders are from RB Magical Mysteries line from Emerald Creek

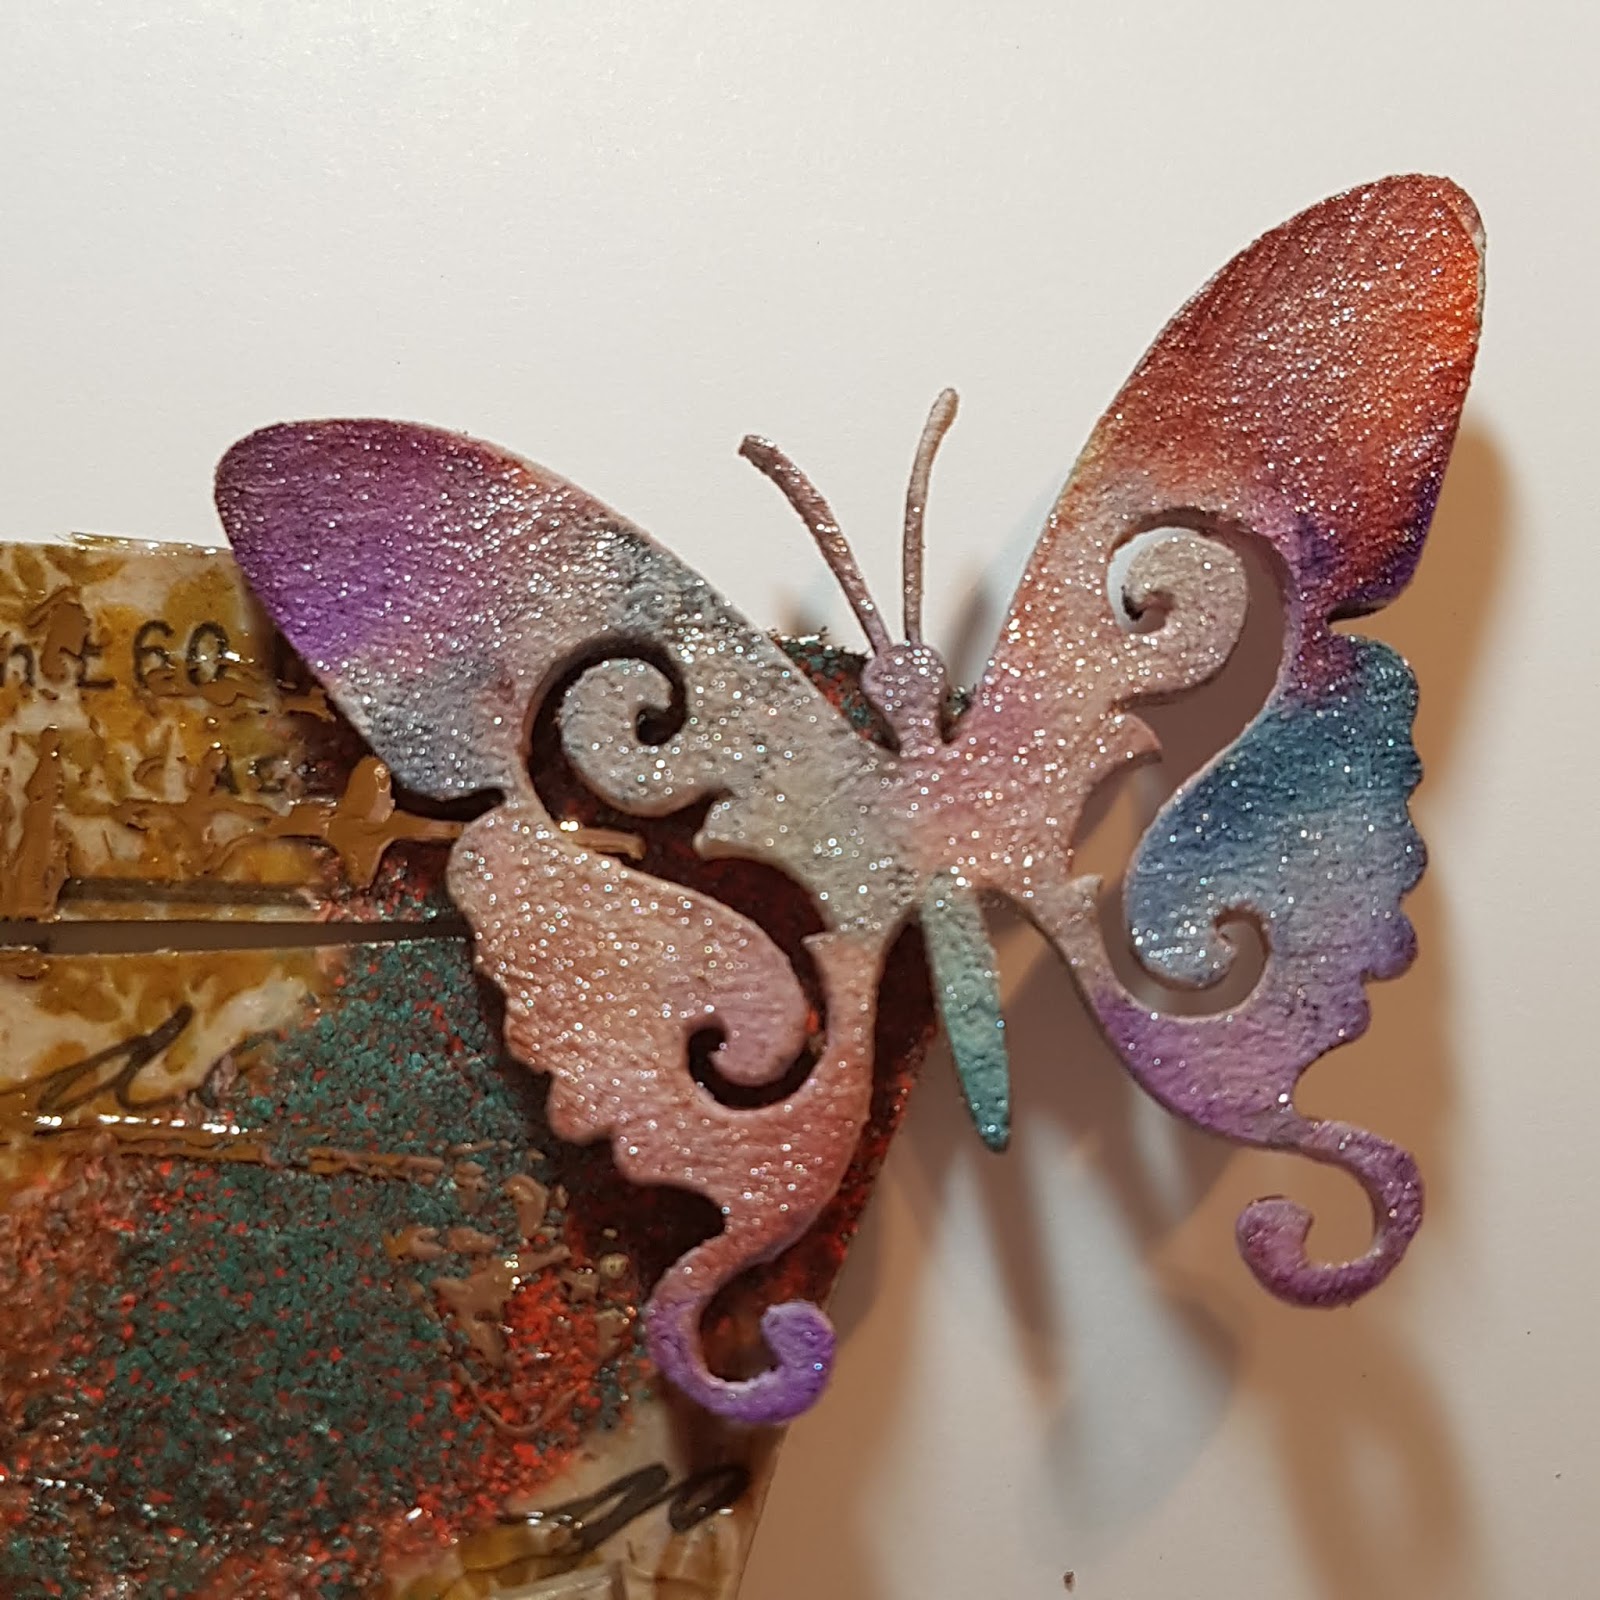
Look at this lovely texture!

I love the simplicity of this tag

Added a touch of RM Mixed Media Medium, some Ranger Foil and a TH Quote Chip


Painted with Finnabair paints, Ranger texture paste through Rebekah Meier's stencil from TCW.

It was an embossing night for sure and I pulled out some of my faves from the Seth Apter Baked Texture line from Emerald Creek.
 

Yumm!! Patina Oxide and Chunky Rust!

Background paper from Canvas Corp, Vintage Beeswax Baked Texture EP, AI dyed roses from TH, TH Quote Chips, TH baubles dyed with AI, Southern Ridge Trading Company Chipboard, Patina Oxide EP

Little close up of my resin roses and baubles, dyed with alcohol ink.

Yes, I am addicted to Patina Oxide embossing powder!

And to be able to hang them all, I used some wire from my stash and Eileen Hull's Twist and Style Tool.


Thanks for stopping by today and have a great day!

Cathy

Monday, June 11, 2018

Putting on My Top Hat

Almost the middle of June already!? I am loving the long days and how light it stays out! I also like that it's light out when I leave for work at 5:30am!
I finally used one of my favorite pieces! I wanted the top hat, I ordered the top hat....then all the ideas I had for the top hat were gone! Thankfully I had a new plan for it.
I layered TH paper, Baked Texture, and a hint of DecoArt Foil and then jazzed it up with the pretty shimmery butterflies.


For all the details and the list of all the products I used head on over to the Southern Ridge Trading Company Blog 

Have a fantastic week everyone!

Cathy

Sunday, June 3, 2018

Flamingo Time!

Oh my word!! I saw the demo that Jess did in the Blank Page Muse Stamps Fan Group and fell in love with the designs from Pam Bray. Now up until this episode I wasn't a fan of flamingos, I liked them but had never thought of stamping or playing with the images. Then Pam and Blank Page Muse happened..darn you!! LOL Now I have them in my craft room! And I am so glad I do!
I am not affiliated in any way, I just love these stamps! The detail and the gorgeous thick rubber is amazing to stamp with! 
You need to see all the amazing images available from Blank Page Muse.

I took Jess's suggestion and used my TH scissors to cut out my rubber and it was glorious! I then used some double sided tape on acrylic blocks to index all my new images!


 Then I had to play a little too! This is my first project using the Flamingo Row and Tropical Dreams stamps.


Here are a few close ups of the project. You need these sets! I love the flowers and drinks and fussy cut all those out to add them to my little frame. I coloured everything in with Distress Markers and a water brush.

It all started with this little guy!


And who doesn't love delicious tropical drinks with umbrellas and in a coconut.


Yum! Added some Distress Clear Rock Candy Crackle!    
 Make sure you head over to Jess's blog to see all her projects with these sets, and definitely go see Pam's blog as well. Also, here is the link to all of Pam Bray's designs with Blank Page Muse.

List of products used:
TH Distress Markers in Spun Sugar, Worn Lipstick, Lucky Clover, Twisted Citron, Black Soot, Spiced Marmalade, Squeezed Lemonade, Vintage Photo
TH Distress Crayons in Mermaid Lagoon and Festive Berries
TH Distress Paint in Frayed Burlap, Vintage Photo and Lucky Clover
Artist's Loft Iridescent Medium  

Thanks for stopping by and hope you have a great week ahead!

Cathy
 

Wednesday, May 30, 2018

Final Forever & Always

Well this post is a bit late. My project was supposed to be up last week but for those that know me, know that my Grandmother passed away on Monday the 21st of May.
The Wild Whisper ladies were kind enough to let me do my final project for them this week instead. It is a bittersweet project for me. It is my last project as a Wild Whisper DT member. These ladies have been so amazing to work with and for. Their products and designs are amazing and they work so hard to bring new and exciting collections to the creative world! It has been an honour and a privilege to work with their designs. Thank you Heather and Suzy for trusting me with your collections. 

Here is my final project using the Forever & Always Collection. This is a picture from my grandparent's 60th anniversary party. They celebrated more anniversaries before my Grandfather passed away in 2013 and now they are together again.


Thank you all for stopping by! Be sure to head on over the Wild Whisper blog to see more details and close ups of the project.

Have a great Wednesday everyone!

Cathy

Wednesday, April 4, 2018

Love Your Story

Can you ever have too many word dies? I think not! And these Shadow Script #1 Thinlits are a must have, how great is it to have the shadow without all the fussy cutting? Okay, I've attempted the fussy cutting on words and I have not ever been successful with it. TH to the rescue with this amazing set! 
More detail pics are over on the Scrap Shotz blog today! 


My second project was created using the Sizzix 3-D Bohemian Botanicals and quick spotlight technique.


Thank you for stopping by and for your support!

Have a wonderful week everyone!

Cathy

Monday, April 2, 2018

Embrace Imperfection

So excited to be sharing my first project with the Southern Ridge Trading Company DT today.  I have used SRTC chipboard for a few years now and love it. I love the intricate  details and these designs can take paint, embossing powder, metallique waxes, anything you want to throw at it. 
My Embrace Imperfection canvas uses SRTC chipboard, TH paper and embellishments and a few of the new Baked Texture Embossing Powders from Emerald Creek/Seth Apter.

Here is my finished canvas. For more detailed pics and close ups head on over to the Southern Ridge Trading Company Blog today.


Thank you so much for having a look and make sure you stop by SRTC to see all the pieces up close. 


SRTC Product Links

Other Products Used:
Baked Texture Patina Oxide
Baked Texture Vintage Beeswax
Baked Texture Dirty Sand
Tim Holtz Etcetera Paper
Tim Holtz Walnut Stain Distress Ink
Finnabair Metallique Wax in Aged Brass, Amethyst Magic and Lucky Emerald
Ranger Glossy Accents
Be Creative Tape
Distress Collage Medium


 Have a great week everyone! Hope you all had a wonderful Easter weekend!

Cathy
 

Wednesday, March 28, 2018

Wild Whimsy and Dragonfly Wings

Oh sweet dragonfly wings! I have my last project for the month up today on the Wild Whisper Blog. Yes, it features the dragonflies and the wings again! Get your Wild Whimsy Collection quickly so you can have these wings in your craft room. This time my dragonflies are hanging out in the Eileen Hull Designs Flower Pocket die.


For all the details and more close up pics, Wild Whisper blog is the place to be! With the dragonfly wings from the Wild Whimsy stamp set, you can turn almost anything into a dragonfly!

Hope your Wednesday is fabulous!

Cathy

Stitched Slots, Baked Texture & 3-D Embossing

WOW!! So much fun creating with some of the new products available over at Scrap Shotz and creating finally with the Baked Texture Embossing Powders!  The new Tim Holtz Stitched Slots ar perfect for traveler's journals!! You can keep more stuff and fit it in!

As you can see from my page I do keep everything!! Don't judge! LOL

This tag fits into the the Stitched Slot on the first page.

And yes...those are the tops of my receipts from Fred Meyer (did you know Fred Meyer sells wine and if you buy 6 bottles at once you get an extra 10% off?!? I know, I need to go there again!! LOL

And this was my second project using the Sizzix 3-D Embossing Folder Bohemian Botanicals and my Baked Texture!!
For more detailed pics head on over to Scrap Shotz Snap Shotz and have a look. 

Happy Wednesday of a short work week!! :)

Cathy

Monday, February 19, 2018

Art Journalling and Me

I have so many journals, but haven't made it a habit to use them. I think the time to start is now! Not a new year's resolution but something I want to do. Once I'm sitting there getting inky/painty/gluey I love it and feel relaxed and I love that feeling. So I need to get in there and just play far more often! So I've started with one page, over a couple of days but used colours that are not my go to choices and stencils and metal and an old piece of cardboard. And I loved it! 

Here is my finished page in my larger Dylusions journal.


The background is done with 3 colours of Distress Oxides, Fired Brick, Vintage Photo and Wild Honey. On the left hand side is a Stencil Girl stencil that I did with gesso first so it acted as a resist. I used the same stencil on the right in Walnut Stain.

Over top of the inked stencil I used a TH stencil with clear texture paste for an added layer.

Again over the ripped up piece of TH Etcetera Stash, I used clear texture paste for another layer.

One of my TH word bands that I had in my stash...also one of my plans for the year is to "use what I have" and dig into my stash and get into a project instead of just sitting around looking pretty haha I used some hemp twine and a piece of cardboard from my last Wild Whisper order.

Loving the foil thing right now!! I need more foil and I really want the Rebekah Meier Mixed Media Medium from Therm Web and some of her transfer foil in Antique Pearl and patina!! So many great colours. The foil I have and used on this one is the Ranger Holiday package, I used the gold and the Vintage package is a must have too.

Thank you so much for stopping by and hope you all have a wonderful start to your week!!

Cathy

Sunday, February 11, 2018

My Crackled Heart

Just a few more days until Valentine's Day! I don't do alot for this day, my kids and I are super cheap and we go get choclates on the 15th when every thing goes on sale! LOL I used to do little gift bags for my kids and as they got older it was different things here and there. Last year it was their favorites pies LOL Not very Valentiney, but they ate the pies. 

This year I had a few things in my stash that I wanted to play with so I pulled them out and made My Crackled Heart. 


I used one of the TH Baseboards from the Christmas pack, the plaster heart is from Relics & Artifacts, first time using that line and love it. The heart was originally painted in metallics from Finnabair, but I changed my mind (like I always do) and repainted it with the Distress Paints in Hickory Smoke and Wilted Violet.

I edged the base board in the Hickory Smoke and Wilted Violet as well. Super messy job on that because I already had a piece of paper that I was going to use to cover most of it.
 
I used my Stencil Girl stencil to add to this spare piece of paper and used the Wilted Violet and Tarnished Brass to highlights a few spots.

I love how it turned out, but I was going to be cutting out the TH Flourish with it. But I now have a new way to colour with my stencils.

Yes..I really love this! Going to try some different colour combos next weekend.

I also stenciled on the heart. It was a little tricky keeping it in place, but I just wanted a small part of the stencil to tie it in.

Before I stenciled on the flourish I added a layer of the Distress Clear Rocky Candy Crackle. I need to get some more of this stuff, I love it!

And here is the finished My Crackled Heart! I also foiled on a little hand drawn arrow and added some rub ons.

It's all about using what you have sometimes. And quite often I forget that I have something. So I keep digging around and finding new things (well not really new, but forgotten about) and pulling them out where I can see them.

Thanks for stopping by and hope you all have a great start to your week!!

Cathy

Challenges Entered:

Monday, January 15, 2018

Trinket Box Die is in the House!

I was so excited to use some of my Christmas money to order the Trinket Box!! And I love the leaf arches from the thinlits set! One day I'll have all the Eileen Hull dies on my wish list :)

And here is my first trinket box!! A Fairy's Den...


Here are a few step outs I did while I was making this little gem.

After I cut out my pieces I inked the covers and spine with Distress Oxides, and painted the tray piece with Finnabair's Sparks in Iris Potion. I also painted the inside black using my Dylusions.


I love shimmer!! And metallic!


While I was letting all of this dry, I used my Twist and Style tool to twist up my wire that would hold my fairy in place. I then painted my fairy in shimmery paints and wax finishes.

Look how perfect that twist is! Now to practice wire words!


A little resin fairy I had in my stash by Prima.
Ohh Hammered Metal Embossing Powder from Emerald Creek Craft Supplies...you make my heart skip a beat! These wooden spools were again bits I found in my stash!

Seriously look at all that melty goodness!

Inside behind the fairy is a little nest of pink mesh (that i saved from a bouquet of flowers)


I added a strip from the Graphic 45 Fairy Dust collection around the tray part. 


Then I added the leaf arches from the thinlits set and added flowers from my stash (which is actually getting low since I want flowers on everything lol )


Again...the finished Fairy's Den, with a little hare charm from Emerald Creek guarding the opening.


Thanks for stopping by and checking things out!! Come back soon as I've got a project for Wild Whisper Designs coming this week too!

Have a great week everyone!

Cathy 

Playing Along With: